This tutorial uses a minimal amount of code to make an Action Cable chat server.
About this app
Users simply visit the homepage, enter their name, and then enter the chat room.
The messages from users will appear as a streaming message feed.
Let’s get started!
Create a new rails app
$ rails new simple-chat
$ cd simple-chat
Remove coffee script
Find the coffee-rails gem in your Gemfile:
/Gemfile
...

# Use CoffeeScript for .coffee assets and views
gem 'coffee-rails', '~> 4.2'

...
And then comment it out:
...

# Use CoffeeScript for .coffee assets and views
# gem 'coffee-rails', '~> 4.2'

...
Run bundle:
$ bundle
Generate a home controller and index page
$ rails generate controller home index --no-assets --no-test-framework --no-helper
Generate a chat channel
$ rails generate channel chat
Start server
$ rails server
Replace your routes file with the following:
/config/routes.rb
Rails.application.routes.draw do
  root 'home#index'
end
Replace the Ruby chat channel file with the following:
/app/channels/chat_channel.rb
class ChatChannel < ApplicationCable::Channel

  def subscribed
    stream_from 'chat'
  end

  def receive(data)
    ActionCable.server.broadcast('chat', data)
  end

end
Replace the JavaScript chat channel file with the following:
/app/assets/javascripts/channels/chats.js
App.chat =
  App.cable.subscriptions.create('ChatChannel', {
    received: prepend_msg
  })

addEventListener('turbolinks:load', function () {
  join_chat_form.addEventListener('submit', join_chat)
  message_form.addEventListener('submit', send_msg)
})

function join_chat(event) {
  event.preventDefault()

  if (!username.value)
    return

  enter_name_container.style.display = 'none'
  messages_container.style.display   = 'block'

  const msg = `${username.value} joined the chat`
  App.chat.send({ msg })

  message.focus()
}

function send_msg(event) {
  event.preventDefault()

  const msg = `${username.value}: ${message.value}`
  App.chat.send({ msg })

  message.value = ''
}

function prepend_msg(data) {
  const p = document.createElement('p')
  add_time_stamp(p)
  p.append(data.msg)
  messages.prepend(p)
}

function add_time_stamp(p) {
  const
    time = new Date().toLocaleTimeString(),
    pre  = document.createElement('pre')

  pre.append(time)
  p.append(pre)
}
Add view
Replace the index erb template with the following:
/app/views/home/index.html.erb
<div id=enter_name_container>

  <p>Enter your name:<p>

  <%= form_tag '', id: 'join_chat_form' do %>
    <%= text_field_tag :username %>
    <br><br>
    <%= submit_tag 'Enter chat', data: { disable_with: false } %>
  <% end %>

</div>

<div id=messages_container style='display: none'>

  <%= form_tag '', id: 'message_form' do %>
    <%= text_field_tag :message %>
  <% end %>

  <div id=messages>
  </div>

</div>
Add styles
Replace the existing stylesheet with the following:
/app/assets/stylesheets/application.css
/*
*= require_tree .
*= require_self
*/

body {
  background: beige;
  font-family: sans-serif;
  margin: 0 auto;
  padding: 2rem;
  width: 400px;
}

pre {
  margin: 0;
}

input {
  padding: .5rem;
}

#message {
  width: 250px;
}
Try it out
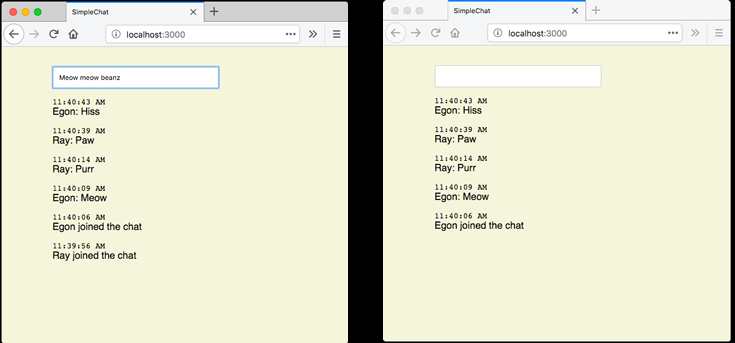
Open two separate browser windows to http://localhost:3000 and have a nice conversation with yourself.
Your browsers should look something like this. In my example, I demo my two cats “Ray” and “Egon” chatting:
For next steps, google “rails action cable tutorial” for more guides and examples that delve deeper into Action Cable.
Enjoy!
]]>